Documentation Index
Fetch the complete documentation index at: https://docs.dovetail.com/llms.txt
Use this file to discover all available pages before exploring further.
Overview
Recruit helps you find and manage participants for research within your Dovetail project. It connects you to a diverse database of over 3 million people through Respondent, allowing you to define target audiences, set recruitment criteria, screen participants, and schedule sessions, all in one place.Please note the following limitations of Recruit at this time:
- We currently only support external recruitment, internal recruitment is not available at this time i.e. bring your own participants.
- Users can only recruit B2B and for interviews only. B2C is not available.
Set up recruit for a project
Managers and Contributors can access recruitment by navigating to the Recruit tab within a project. You can set up recruit for your project in one of two ways:- Use AI to generate your plan draft from a prompt or;
- Build your plan manually by filling in each section yourself.
- AI setup
- Manual setup
Use AI to generate your recruit plan
- Start by adding your research objective, this can be anything from a single sentence, a brain dump paragraph, or a specific requirement. Dovetail’s AI will take your objective and automatically generate and fill out your entire study plan for you.
- Once you’ve added your objective, click Generate plan. Dovetail will create a complete recruit plan draft. Review the Overview page, add your availability, and confirm payment when you’re ready.
Sync your calendar and conferencing tool
Managers and Contributors can access recruitment by navigating to the Recruit tab within a project. When setting up your recruit plan, you must connect your calendar (powered by Cronofy) and conferencing tool.- Under the Availability tab, select Add calendar account and follow the prompts to link your calendar. This is a one-time setup.
Complete payment for recruit
Recruit (beta) currently operates on a pay-as-you-go model, requiring users to input a credit card for a one-time upfront payment when creating up recruitment for their project. You will be charged based on the number of participants required for your study plus an incentive fee. For example, if you require 5 participants, you will be charged a recruitment fee per participant and incentive fee per participant. See a breakdown of this below:- Recruitment fee: For sourcing and managing participants for B2B moderated interviews, Dovetail charges a $75 fee per participant.
- Participant incentive: This is the incentive each participant will receive for their time. Participants will receive payment on their end once they have been marked as Attended by a Dovetail user.
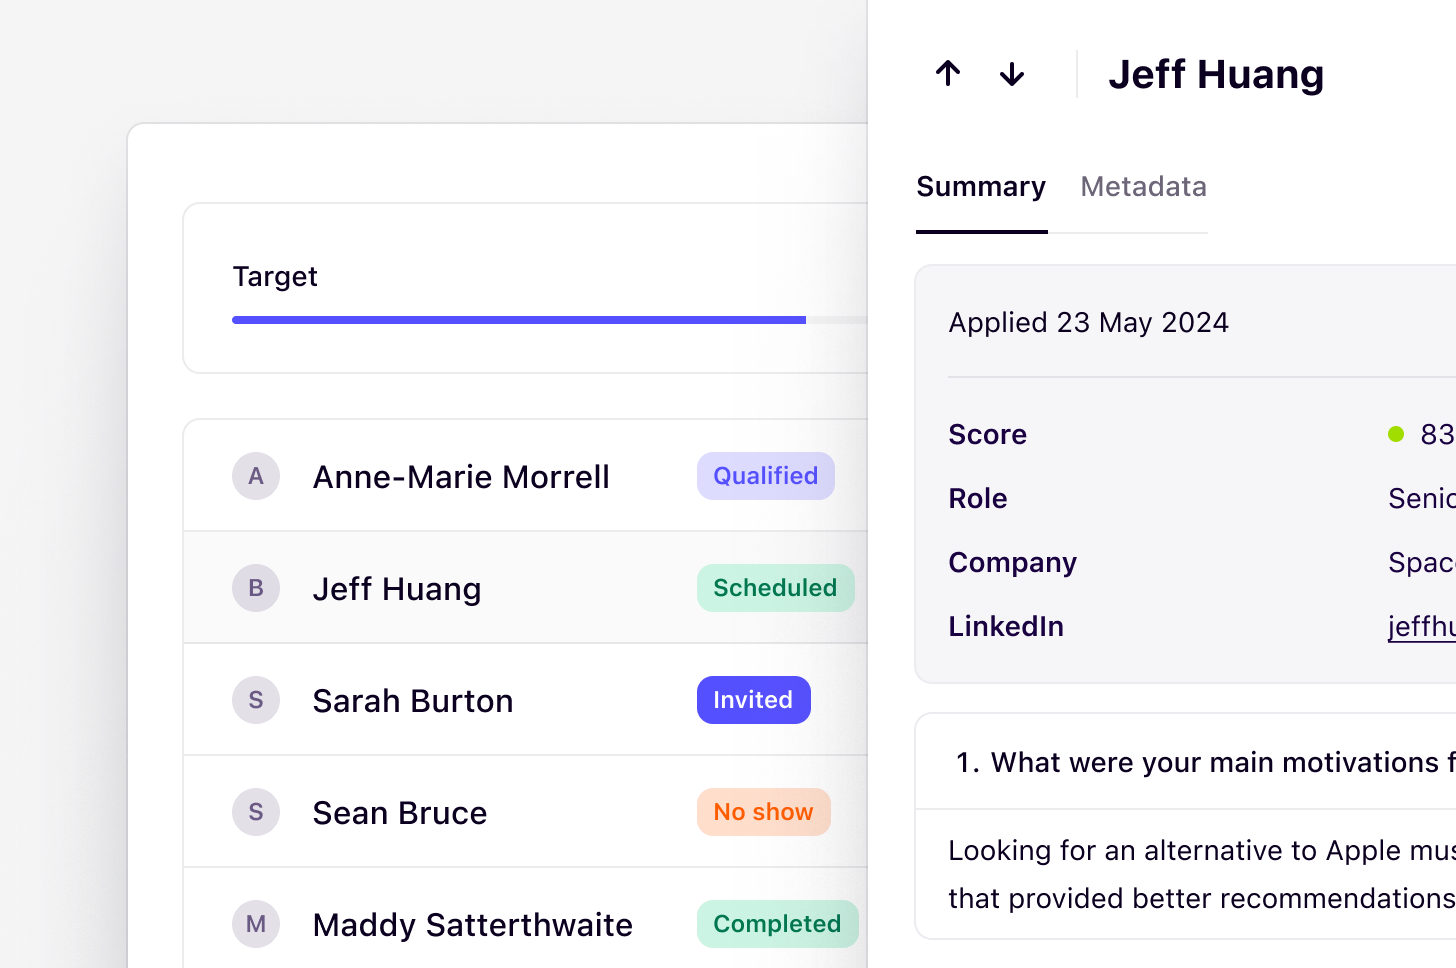
View and screen participants
Once recruitment is live, potential participants who meet your criteria will start to appear. You can review their responses to screener questions, as well as associated demographic details.Qualify, invite, and disqualify participants
After reviewing participant profiles, you can mark them as:- Qualified: The participant meets your criteria and can be invited to book a session.
- Disqualified: The participant does not meet your criteria and will not be contacted.
Manage scheduled participants
Participants who book a session will automatically appear as Scheduled. These bookings sync with your connected calendar. After the session, you can mark participants as Attended to trigger incentive payments or mark as No show if they didn’t attend.- To update a participant’s status, navigate to the participant’s profile and click
••• - Next, select the appropriate status. Participants marked as
Attendedwill be automatically added to your Contacts database.
Pause and end recruitment
If you’ve reached your target number of participants or want to temporarily stop participants coming through the pipeline, you can pause recruitment to stop new applications.- To pause recruitment, open the
Recruittab in your project and clickPause recruitment.
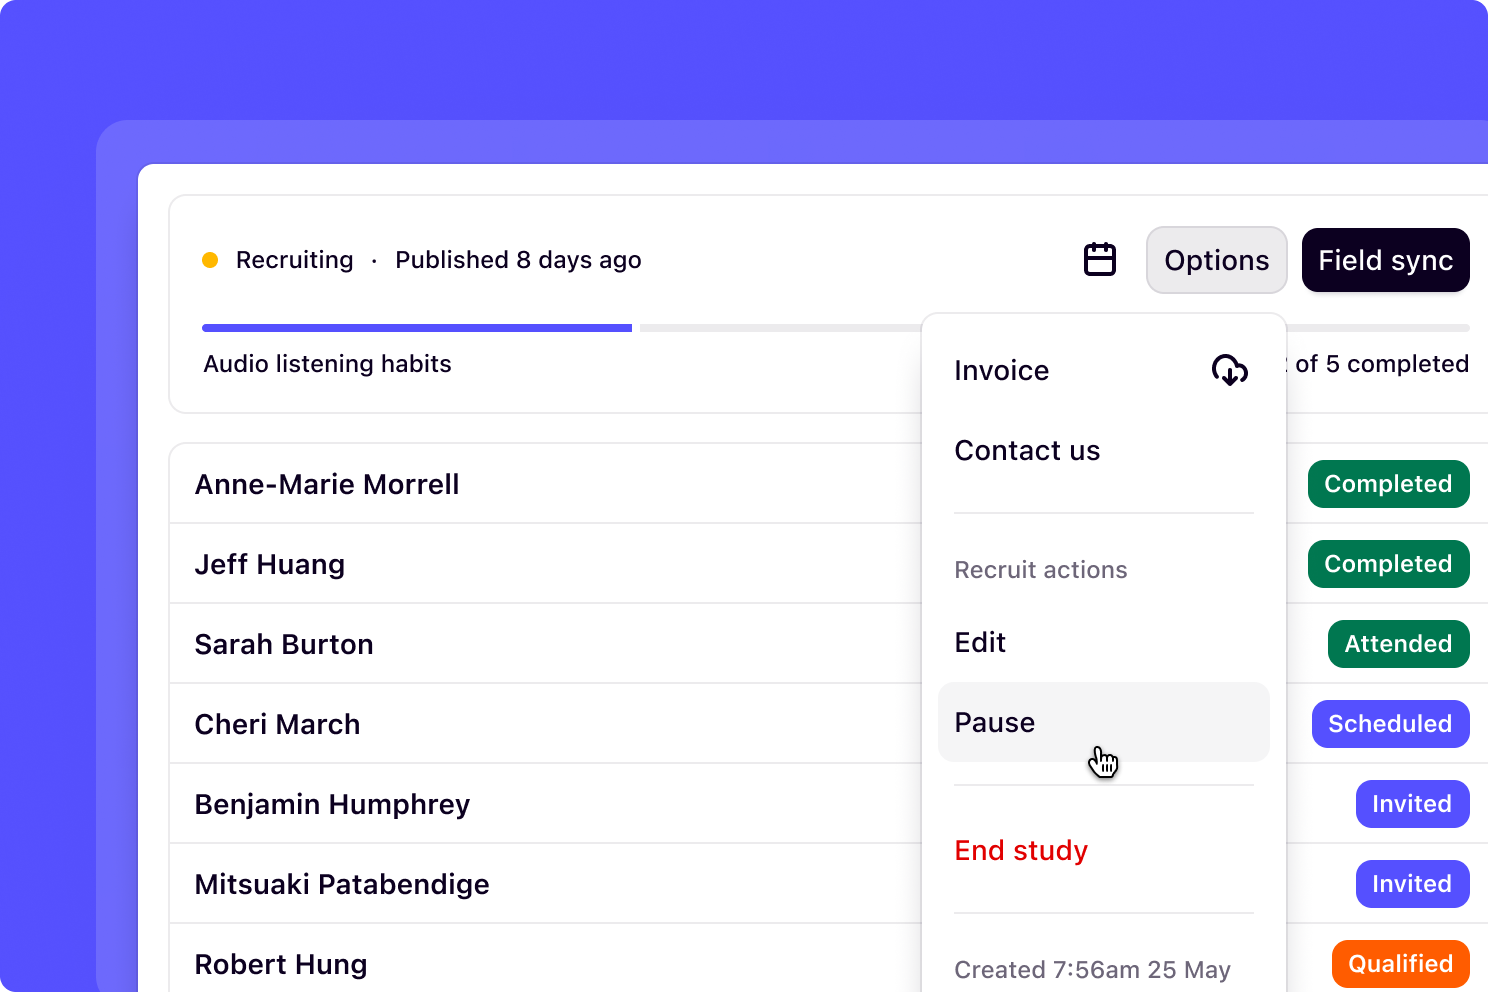
- To do this, open the
Recruittab in your project, navigate toOptionsbutton and selectEnd.
Manage attended participants in contacts
Participants marked as Attended are automatically added to your Contacts database. You can sync participant fields at any time by clicking theField sync button. This ensures their information stays up to date in your database and is ready to use when conducting follow-up interviews or future research. Turn on the metadata fields to be synced, then map their attributes to your workspace’s custom Contact fields to ensure proper alignment.
FAQs
What countries can I recruit participants from?
What countries can I recruit participants from?
Recruit is powered by Respondent, which gives you access to a vast and diverse pool of research participants from 150+ countries.Respondent’s primary target markets include 21 countries (from a total of 242 targetable countries): Australia, Brazil, Canada, Colombia, France, Germany, Italy, India, Indonesia, Ireland, Japan, Kenya, Mexico, Netherlands, New Zealand, Philippines,Singapore, South Africa, Spain, the United Kingdom, and the United States.Check out Respondent’s panel book for a full list of available countries.
What are the top industries and job titles I can recruit participants from?
What are the top industries and job titles I can recruit participants from?
- Industries include Computer Software, Entertainment, Health & Fitness, Marketing & Advertising, Internet, Computer Games, Healthcare, and Education.
- Job titles include Software Engineer, Teacher, Management Analyst, Salesperson, Operations Manager, Marketing Manager, Chief Executive, and Healthcare Worker.
How much should I pay for an incentive per participant?
How much should I pay for an incentive per participant?
The incentive for research participants depends on factors like interview length, expertise, and effort required. As a guide, standard rates range from $25–$50 USD for short (15–30 min) interviews to $100–$250+ USD for in-depth (60–90 min) sessions, with specialists often requiring $150–$500+ USD.Hard-to-reach participants or those providing expert insights may need higher compensation. Fair incentives help increase participation, reduce drop-offs, and ensure ethical research practices. Offering competitive rates aligns with industry standards and respects participants’ time.
What are some best practices for writing screener questions?
What are some best practices for writing screener questions?
Effective screener questions are vital for recruiting the right study participants. Below are some tips for writing screener questions:
- First, clearly define your ideal participant, including both qualifying and disqualifying criteria, then structure your screener like a funnel, starting broad and narrowing down with elimination questions first.
- Writeclear ,concise , andunbiased questions , avoiding jargon, leading statements, or binary options that reveal desired answers. For example:
- _Bad example: _“Wouldn’t you agree that our app is user-friendly?”
- _Good example: _“How would you rate the user-friendliness of our app on a scale of 1 to 5?”
- To ensure accuracy, disguise your specific study criteria by embedding them amongst distractors. Always include quality checks like “red herring” questions to identify inattentive respondents. Keep the screener brief—ideally 5-10 questions—to prevent participant fatigue.
- Finally, always pilot your screener with a few external individuals to identify any confusion or errors before launching recruitment.
How can I request a refund for my study?
How can I request a refund for my study?
In specific cases, you may request a refund by contacting support@dovetail.com. Any refunds will be issued only to the credit card used for original payment.
Do I need to put instructions on how to download the conferencing tool link for participants?
Do I need to put instructions on how to download the conferencing tool link for participants?
Participants will receive a confirmation email with the conferencing tool link as well as automatic reminders. These emails will also prompt them to download the conferencing tool if they haven’t already.
Can I reach out to the participant after scheduling a session with them?
Can I reach out to the participant after scheduling a session with them?
Unfortunately, no. There isn’t a direct way to message participants after scheduling as a limitation of our partnership with Respondent. However, participants do receive automated email confirmations and reminders prior to the session.