

Available to workspace admins only
Overview
Personalize your workspace by adding company branding, updating the workspace subdomain, customizing your home page, and curating live feeds to keep your team up-to-date with the latest customer intelligence. Two settings are documented separately: Beta features, where admins turn early features on for the workspace, and the Home page, where admins choose what everyone sees when they open Dovetail.Set the workspace logo
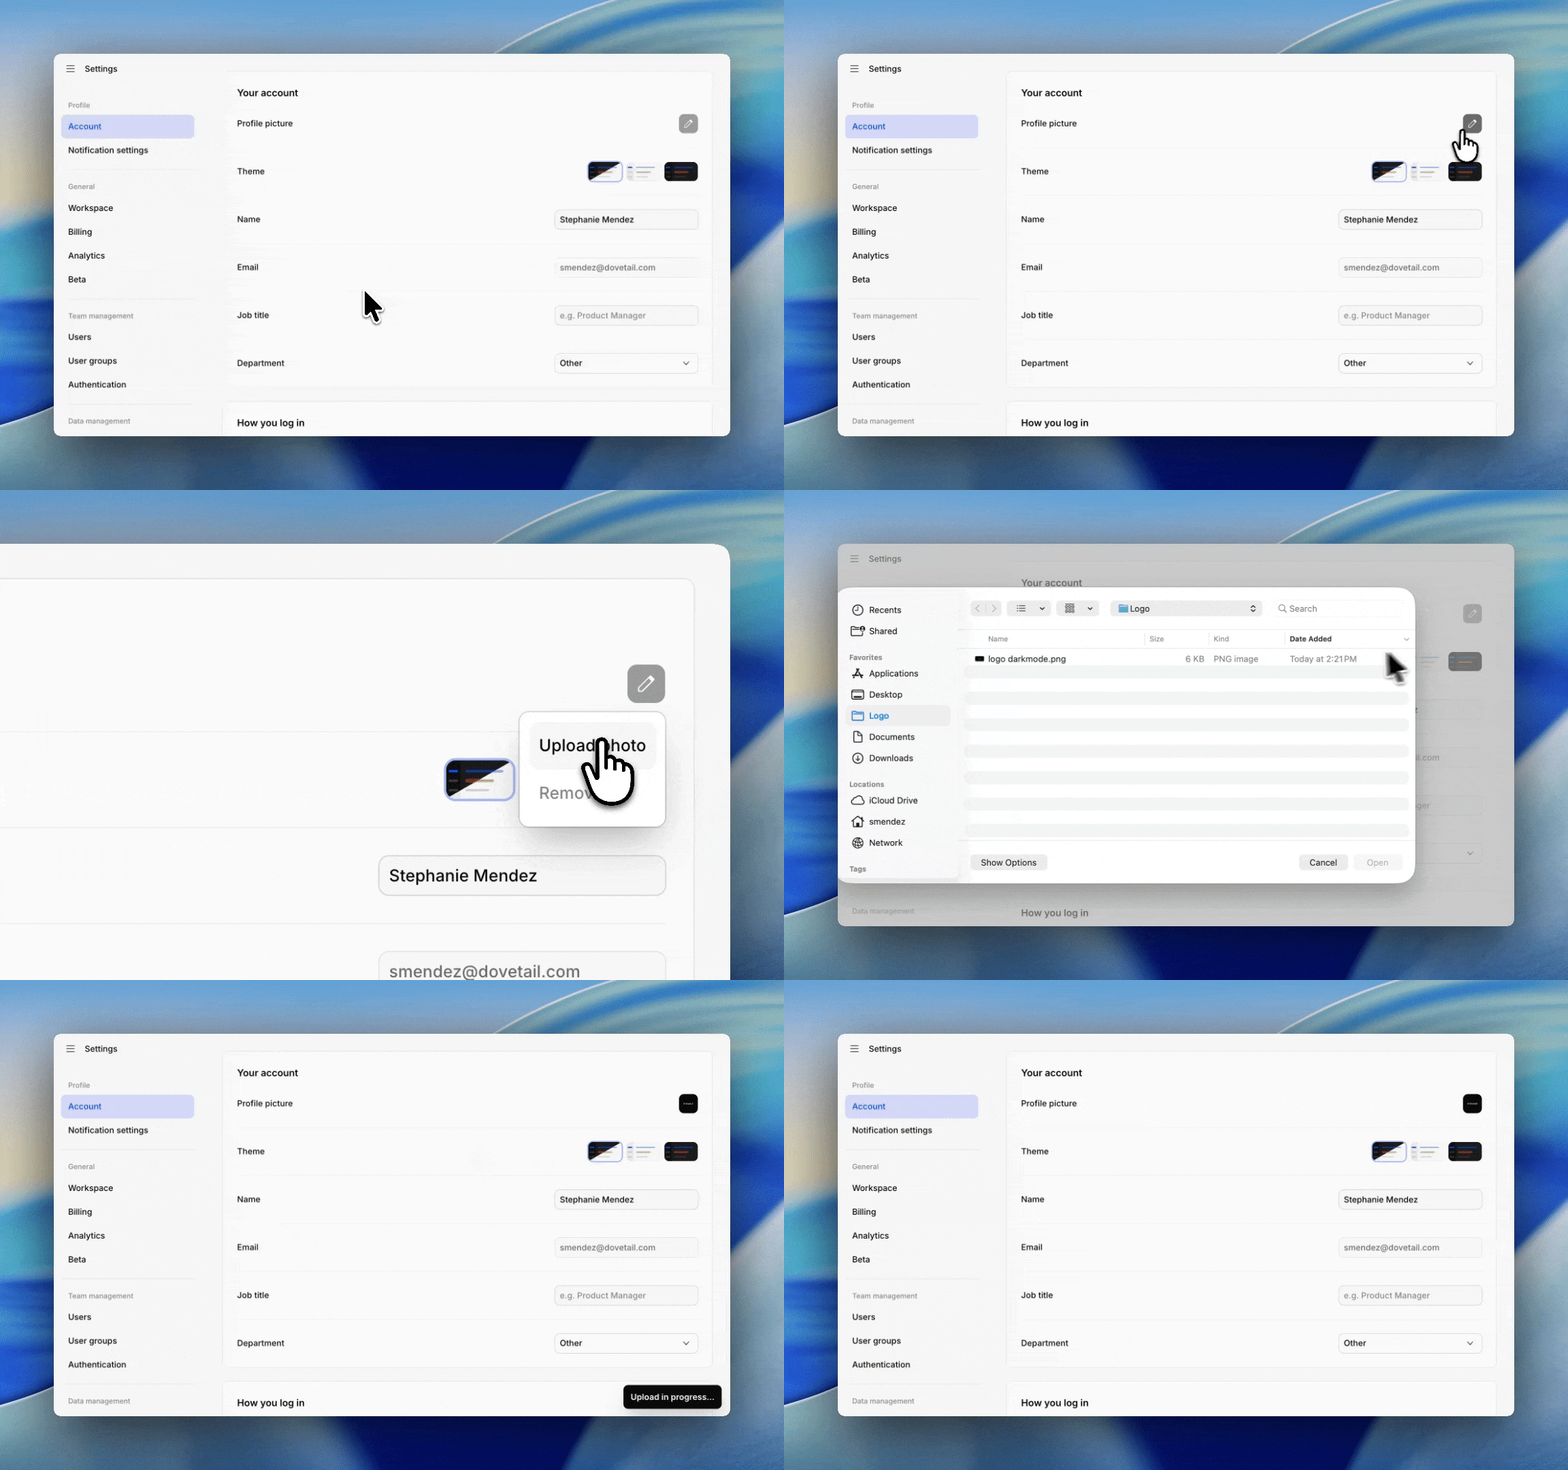
We recommend using a logo aligned to your organization’s or client’s brand, so it is easily identifiable for stakeholders consuming your customer findings. To set the logo for your workspace, navigate to:- ⚙️ Settings → Under Logo → Click on the icon
- Click on
Upload logo - You can upload an image to help identify the workspace to stakeholders.
Name your workspace
We recommend setting the name of your workspace to your organization’s name (e.g. ACME) or team’s name (e.g. ACME Research). To name your workspace, navigate to:- ⚙️ Settings → Edit the textbox under Name
Contact Information:
Workspace admins can add contact information to help us reach the right people for security or technical issues. This includes:- Security contact email
- IT contact email
- ⚙️ Settings → Type the emails within the designated section
Organization type
Workspace admins can update, change, or clear the Organization type at any time from the workspace settings. You can select from the following organization types:- Consulting
- Education
- Government
- Not-for-profit
- Product
- Service
- Small Agency
- Startup
- The information is used for:
- Internal analytics and reporting
- Providing organization context to some AI-generated question suggestions
Region
You can view which region your data is stored in by navigating to ⚙️ Settings → Workspace → RegionSelecting a data region
When creating a new workspace, you can choose where your workspace data is stored:- United States
- Australia
- Europe
- us-east-1 (North Virginia)
- us-east-2 (Ohio)
We do not currently support migrating workspaces between regions. Once a region has been selected for a workspace, it cannot be changed.
Customize your subdomain
Available on the Enterprise plan
- To update your domain, navigate to ⚙️ Settings → Workspace and enter a new domain in the textbox under Subdomain.
Context
Workspace admins can link existing Docs as AI context for the entire workspace. Once linked, that content is automatically synthesized into the context Dovetail AI draws on across every chat surface — Chat, Agents, and Ask Dovetail — so teams get more relevant, on-brand answers without needing to paste or repeat context in every conversation. Text, PDFs, and embeds are all read and passed to the model. For how to write a context doc that measurably improves those answers, see Craft context for AI. Good candidates for context docs include:- Company and product context — who you are, what you build, your market position, key terminology
- Strategy and priorities — company direction, OKRs, what’s in and out of scope
- Pricing and packaging — tier structures, plan names, feature availability
- Customer and market context — your ICP, key segments, how you talk about customers
- Product domain knowledge — how your product works, feature definitions, known limitations
- Brand and tone guidelines — so AI-drafted content matches your voice
- Research frameworks and templates — so AI-generated Docs follow your team’s structure
- Navigate to ⚙️ Settings → Workspace
- Under Context, click to link or create a Doc
- Search for and select the Doc(s) you want to add
Delete workspace
Only workspace admins can delete workspaces. When you delete your workspace, we will process the deletion in accordance with our Data Management Policy, available in our Trust Center. To delete your workspace, a workspace admin can:- Navigate to ⚙️ Settings → Workspace Settings → select
Delete workspace - From there, type
"DELETE WORKSPACE"into the confirmation field to confirm your action, and then click"I understand the consequences - delete this workspace!"to confirm the deletion
- Your data will be deleted in accordance with our data retention policy.
- If you do choose to subscribe again, the price may have changed or your previous plan may no longer be available.
Deleting paid workspaces
Paid workspaces must first be canceled or downgraded to the Free plan before they can be manually deleted. If you’d like to delete your workspace, contact your Customer Success Manager to discuss cancellation or downgrade options. Once your subscription is no longer active, you can proceed with manually deleting your workspace.Update your workspace transcription language
Available on the Enterprise plan
- ⚙️ Settings → Transcription → Workspace transcription language
- Choose to remain on the default, “Auto-detect,” or update it to your preferred language
Update your workspace transcription provider
Available on the Enterprise plan
- ⚙️ Settings → Transcription → Workspace transcription provider
- From there, you will have the option to select Amazon Transcribe, Assembly AI or leave as Default
- If you select Default, we’ll automatically use the provider we believe is best for your data based on the transcription language required.
Support access consent
Managers and Contributors can grant Dovetail employees temporary access to their workspace for support purposes.Grant support access
When chatting with our support team, you may be asked to consent to access your account to help with troubleshooting or recovery. If you are a Manager or Contributor, you can grant support access by following the steps below. If you are a Viewer, you will need to ask a user with a paid seat to grant support access for you.- Navigate to ⚙️ Settings
- Click on
Account - Navigate to
Support accessand clickAllow support access
Revoke support access
To revoke support access before the specified expiration date, Managers and Contributors will need to follow the same steps used to grant access.- Navigate to ⚙️ Settings
- Click on
Account - Navigate to
Support accessand clickRevoke support access